Thursday, September 29, 2011
Selling myself
Over the last couple of days I have been out trying to expand my business. This is no easy task walking into a shop and trying to sell my service. For the most part shop owners are pretty busy and it is hard to get their attention. Most of the time I get a head nod and the usual response of "We do diagnostics here too." I try to get my main points across in a hurry. I typically have about 3 minutes. Yes, I have timed it. In 3 minutes I have to convey to the shop owner that I am capable, equipped, and on his side. The capable part is usually the easiest. I tell a little bit about myself, my past, etc. The equipped portion is a little harder. All the shops have scanners, some have labscopes, some have J2534 programming capabilities, a few have low amp probes. What the average shop owner/tech doesn't realize that there are limitations to aftermarket scanners and J tools. While many aftermarket scantools claim that they are OE level tools unfortunately they are not (look at my ongoing Ottotest posts). That is where owning factory scantools is essential. This is by no means a knock on any shop or shop owner at all. There is a lot of misinformation out there, 90% of the time a quality aftermarket scantool or J2534 tool will do the job. The other 10% of the time I can help them with OE tools, along with my knowledge and experience. This is where I earn my keep. The convincing the shop owner I am on his/her side is by far the hardest. I make sure to mention numerous times I only service professional shops only. I am not the competition. I am not here to take anybody's job or to rub someone's nose in a problem. Nor, do I hold myself above anybody else. My service is a supplement to an already well performing shop. As any of the shops that I service will tell you I am also not secretive. I teach as I diagnose or after. I am not one of these guys that says change that part because "I say so." I always share with anyone who will listen how I arrived at that decision. My service helps keep the shop's customers in their bays instead of somewhere else. Diagnostics does not pay the rent in a shop. Do not let anyone fool you. But, solid diagnostics keeps them coming back in for the brakes, exhaust, and service work that does pay the rent. I have to get all of that across in 3 minutes or less to a person who probably is worried whether Mrs. Jones' check is going to clear, how he is going to meet payroll, the parts house is 2 hours late with a part that the customer is waiting for, etc. Most shop owners are masters of multi-tasking. That is another reason why my service works-I am focused and can give my undivided attention to that problem that is eating away at shop productivity and bottom line. I always follow up with shops after the initial meet and greet in about 2 weeks. I can usually get a feel if the shop is going to use me after that. I always try to stay positive with my visits. There are a lot of great people in the automotive industry. I have met some real good quality individuals stopping in and saying hello. I never stop trying to get new business and I always take the time to help out a shop. You never know when it could turn into some newfound business. Now, if a shop decides to use me they usually throw a problem vehicle that they have been knocking their head against the wall at me. It is like a trial by fire type of scenario. If I solve the issue and impress the shop I get the business. In this business you definitely have to walk the walk.

Monday, September 26, 2011
1999 Chevrolet Monte Carlo


Monday, September 5, 2011
1997 Dodge Stratus
I am called to Mr. D's shop to look at a 1997 Dodge Stratus 2.4 liter with an overheat condition at an idle in traffic conditions. The car has 182,374 miles on it so the sky is the limit. Given the fact that it only seems to overheat at a standstill makes me really want to look at the cooling fans and the cooling fan circuitry. I hook up my scanner and check for codes. No codes are present. The reason I check for codes is for circuit integrity. If there was something open or grounded in the control circuitry it should set a code for that particular circuit. In this case we have low speed and high speed fan circuits. These fan circuit codes don't always trigger the MIL lamp and I never take anything for granted. Next thing is I command the fans on low speed and high speed with my scanner. I hear the fans come on so I know something is happening. With that being said. I start the car and select from my scanner the Engine Coolant Temperature Sensor pid along with Time From Start, Low Speed Fan Command, and High Speed Fan Command. When I start the car the temp is around 85F. I use time from start all the time for coolant related issues. It is very useful for looking for thermostat issues, etc. As I let the car warm up I graph my pids. I am also listening to the banter at Mr. D's shop. It is one of those fun shops. You never know when you are going to get sprayed with carb spray and then lit on fire. Or, if you drop an attached caliper from the control arm while doing a brake job Mr. D will yell out "should I order a brake hose now?" Meanwhile, he is all the way across the shop at his desk and you ask yourself how did he know? Yeah, it keeps you on your toes but at the same time it keeps things light. Shop life at it's best.
Alright back to the overheat. About 12 minutes later the temp is creeping up to low speed fan turn on temperature which is about 221F. I see the low speed fan command flip to "on" on my scanner and I hear the fans come on. The temperature however instead of dropping stays right around turn on temperature. I look at my fans and only the drivers side fan was on. The passenger fan is dead. Huh? I know from experience that these fans run at the same time. I smack the offending fan with a backend of a screwdriver and it comes to life. Ok, we are on to something. I am still worried about the quick time to get up to operating temperature.
It was a little quick for me. I shut off the vehicle and check the coolant level. Well a gallon of coolant later and we are filled and I am back monitoring. Now, both fans are coming on and the temperature is behaving. Was I seeing things with that fan not coming on? At this point I can look at the fan motor's integrity through my low amp probe. I have two pretty much identical motors so I can compare.
 This is the drivers side motor. It is drawing about 8 amps and has a nice even signature. I see nothing wrong here. It is drawing properly and the pattern is excellent. Now, let's look at the passenger side.
 Geez. I wasn't seeing things. This motor is drawing close to 22 amps and the pattern is awful. My low amp probe confirms that this needs a cooling fan motor. I advise Mr. D of this and show him these pictures. Oh by the way there was a leaking hose connection that caused the low coolant level. Now if I can get out of Mr. D's without getting set on fire.....
Alright back to the overheat. About 12 minutes later the temp is creeping up to low speed fan turn on temperature which is about 221F. I see the low speed fan command flip to "on" on my scanner and I hear the fans come on. The temperature however instead of dropping stays right around turn on temperature. I look at my fans and only the drivers side fan was on. The passenger fan is dead. Huh? I know from experience that these fans run at the same time. I smack the offending fan with a backend of a screwdriver and it comes to life. Ok, we are on to something. I am still worried about the quick time to get up to operating temperature.
It was a little quick for me. I shut off the vehicle and check the coolant level. Well a gallon of coolant later and we are filled and I am back monitoring. Now, both fans are coming on and the temperature is behaving. Was I seeing things with that fan not coming on? At this point I can look at the fan motor's integrity through my low amp probe. I have two pretty much identical motors so I can compare.


Ottotest Update
Well I am happy to report that after the last update to my Ottotest. I was able to graph ABS data on my Dodge Durango. This must have been one of the "Client requested enhancements" that they have on the update screen. I will have to see if graphing has been added across the board to all modules and all makes. At least I can say they are listening. I am using the tool more and more as time goes on. It is still slow and the tablet battery life is horrible but the tool is evolving. It is nowhere near any of my factory tools. Then again what aftermarket tool is.
Saturday, August 27, 2011
A tale of two Chryslers
I am called to a shop this day for a problem with a 1997 Chrysler Sebring with a 2.5 liter V-6 motor. The shop owner explains to me that this vehicle has been all over the place. Lots of replacement parts. It runs real poor. So poor that the catalytic converter glows red after only a few moments of operation. The shop owner has had enough of this car. He has spent a considerable amount of time and resources on it. The vehicle sets Cam/Crank error codes as well. It has had multiple crank sensors. After listening to the shop owner and hearing the vehicle run. I am pretty sure we have some cam and crank relationship issue. I have been down the road with these vehicles before. There are many things that can go wrong from improper timing belt replacement, broken camshaft dowel pins, worn crankshaft gears, wrong or damaged flywheels, wrong year PCM with wrong flywheel with wrong camshaft sprocket, etc. The first thing I do is scope camshaft sensor and crankshaft sensor to look at the signals and more importantly the relationship between the two.
 There she is. The crankshaft sensor reads off the flywheel and the camshaft sensor is inside the distributor which is driven off the end of the camshaft. The relationship between the two looks great. Amplitude of signals and ground point are also excellent. However, I am seeing a very weird crankshaft sensor pattern.
 I changed the timebase so we can see more detail. Here the crankshaft sensor signal (arrows) is not what it is supposed to be. There should be four equal pulses reflecting the slots in the flywheel. If you look at the pattern sometimes we have this more often we have this freaky pattern. Hmmm. Do we have a damaged flywheel? This car has been around the block. Who knows how many times the transmission or engine has been out of this. Remember, this car has had multiple new crankshaft sensors. Something tells me that the problem still is with the crankshaft sensor itself rather than the flywheel. I recommend to the shop owner to get an OE crankshaft sensor and to make sure it has the felt spacer on the end of it. This felt spacer is the air gap adjustment between the sensor and flywheel. When installed it will bottom out. The first start takes the felt spacer off and sets the air gap. Subsequent crankshaft sensor removals and replacements require this felt spacer to be reinstalled before sending the sensor back home. I have seen plenty of aftermarket crankshaft sensors that do not posess this spacer. Installing the sensor without the spacer will cause certain sensor damage. I inform the shop owner of my hunch. But, warn him that he may be taking this transmission out. I reason with him that I would rather gamble with the sensor than a transmission removal. He agrees.
A couple of days later he calls me. He goes on to tell me that the vehicles crankshaft sensor he removed had obvious contact damage. The new OE sensor fixed the car and the car runs well. I was happy for him.
The next Chrysler is a 1995 Chrysler Cirrus with a 2.5 liter V-6 motor. It is a crank no start. Also, the shop owner says it has no scantool communication. I crank the car over. It has a nice even cranking sound. I hook up my scantool and I indeed have communication. This is one of those vehicles that have the familiar OBD2 data link connector but are really not true blue OBD2. We used to call these cars OBD one and a half on the techline. I check certain key parameters on the scanner such as map voltage, vehicle theft status, and cranking inj pulse. All look good. I check spark quality and scope ASD (Automatic Shutdown) relay voltage and injector pulse right at an injector. I have great spark, good ASD voltage cranking, and proper injector pattern. What gives? I spritz a little carb spray into the throttle body and car cranks starts and stalls. I break out the propane and can run the car. Ok, I know I have no fuel. Hooking a fuel pressure gauge up on this vehicle is a pain in the a$#. So, I use ATM (Actuator Test Mode) to actuate the fuel pump relay. I hear the relay click but no fuel pump operation. I remove the relay to jump out and look at the pattern with my low amp probe.
 I removed the relay next to it for comparison. Do you see what is missing?
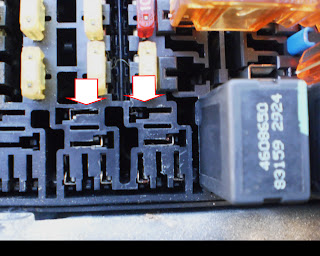 The terminal that is the output of the relay out to the fuel pump is not there. It has sunk down below where the relay blade terminals will make contact. I am able to use a long duckbill terminal to make contact with it to get this fuel pump to run. I hear the fuel pump turn on. I try to start and we still have a no start. Huh? The fuel pump is wailing away. Ok, lets get the low amp probe on there.
 So we have a nice pattern. But very low amperage. I typically see 4-5 amps on these vehicles. Even a cheap pump will give me 3 or so. This is very low at barely 2 amps. Ok, we have a good pattern but low amperage. What would cause that? I think we are out of gas. A quick rap on the tank confirms this. I advise the shop owner to remove the underhood fusebox and repair the terminal. Oh yeah, put some gas in it as well.


A couple of days later he calls me. He goes on to tell me that the vehicles crankshaft sensor he removed had obvious contact damage. The new OE sensor fixed the car and the car runs well. I was happy for him.
The next Chrysler is a 1995 Chrysler Cirrus with a 2.5 liter V-6 motor. It is a crank no start. Also, the shop owner says it has no scantool communication. I crank the car over. It has a nice even cranking sound. I hook up my scantool and I indeed have communication. This is one of those vehicles that have the familiar OBD2 data link connector but are really not true blue OBD2. We used to call these cars OBD one and a half on the techline. I check certain key parameters on the scanner such as map voltage, vehicle theft status, and cranking inj pulse. All look good. I check spark quality and scope ASD (Automatic Shutdown) relay voltage and injector pulse right at an injector. I have great spark, good ASD voltage cranking, and proper injector pattern. What gives? I spritz a little carb spray into the throttle body and car cranks starts and stalls. I break out the propane and can run the car. Ok, I know I have no fuel. Hooking a fuel pressure gauge up on this vehicle is a pain in the a$#. So, I use ATM (Actuator Test Mode) to actuate the fuel pump relay. I hear the relay click but no fuel pump operation. I remove the relay to jump out and look at the pattern with my low amp probe.


Sunday, August 14, 2011
2007 Dodge Caliber


Ottotest Update
Well, I have now had the Ottotest for close to 6 months now. It has disappointed me more times than not. It is billed as an OE level tool. It does not even come close. The latest disappointment was a 1999 Hyundai Tiberon. The Ottotest didn't even have a menu for this car either using the vehicle or the VIN number. The tablet battery life is extremely short and it seems to struggle with the Nissan/Infiniti platform. There have been numerous updates. These updates typically are for 2010 model year coverage. I feel the tool and it's owners would be better served if they would concentrate on increasing the capabilities of the scanner on 2000-2008 model year vehicles. Case in point would be Ford automated evaporative test. Something, the Ford IDS scantool does that the Ottotest does not. I feel the tool is improving but it is at a snails pace. The typical updates always lists "client requested enhancements". Well tell me in detail what the enhancement is! I do use it more and more. I was recently checking an Infiniti I-30 for a shop and was showing him the graphing capabilities the Ottotest provides. The shop owner definitely liked what he was seeing. The Ottotest does do an excellent job of graphing. The speed of the tool needs to be increased tremendously. In the real world speed of a scanner from boot up to diagnosing is paramount. We technicians are not a patient group. I will keep you posted.
Subscribe to:
Posts (Atom)